Sign commits with GPG (FREE)
You can sign the commits you make in a GitLab repository with a GPG (GNU Privacy Guard) key. When you add a cryptographic signature to your commit, you provide extra assurance that a commit originated from you, rather than an impersonator. If GitLab can verify a commit author's identity with a public GPG key, the commit is marked Verified in the GitLab UI. You can then configure push rules for your project to reject individual commits not signed with GPG, or reject all commits from unverified users.
NOTE: GitLab uses the term GPG for all OpenPGP, PGP, and GPG-related material and implementations.
For GitLab to consider a commit verified:
- The committer must have a GPG public/private key pair.
- The committer's public key must be uploaded to their GitLab account.
- One of the email addresses in the GPG public key must match a verified email address used by the committer in GitLab. To keep this address private, use the automatically generated private commit email address GitLab provides in your profile.
- The committer's email address must match the verified email address from the GPG key.
GitLab uses its own keyring to verify the GPG signature. It does not access any public key server.
GPG verified tags are not supported.
For more details about GPG, refer to the related topics list.
View a user's public GPG key
To view a user's public GPG key, you can either:
- Go to
https://gitlab.example.com/<USERNAME>.gpg. GitLab displays the GPG key, if the user has configured one, or a blank page for users without a configured GPG key. - Go to the user's profile (such as
https://gitlab.example.com/<USERNAME>). In the upper-right corner of the user's profile, select View public GPG keys ({key}).
Configure commit signing
To sign commits, you must configure both your local machine and your GitLab account:
- Create a GPG key.
- Add a GPG key to your account.
- Associate your GPG key with Git.
- Sign your Git commits.
Create a GPG key
If you don't already have a GPG key, create one:
-
Install GPG for your operating system. If your operating system has
gpg2installed, replacegpgwithgpg2in the commands on this page. -
To generate your key pair, run the command appropriate for your version of
gpg:# Use this command for the default version of GPG, including # Gpg4win on Windows, and most macOS versions: gpg --gen-key # Use this command for versions of GPG later than 2.1.17: gpg --full-gen-key -
Select the algorithm your key should use, or press Enter to select the default option,
RSA and RSA. -
Select the key length, in bits. GitLab recommends 4096-bit keys.
-
Specify the validity period of your key. This value is subjective, and the default value is no expiration.
-
To confirm your answers, enter
y. -
Enter your name.
-
Enter your email address. It must match a verified email address in your GitLab account.
-
Optional. Enter a comment to display in parentheses after your name.
-
GPG displays the information you've entered so far. Edit the information or press O (for
Okay) to continue. -
Enter a strong password, then enter it again to confirm it.
-
To list your private GPG key, run this command, replacing
<EMAIL>with the email address you used when you generated the key:gpg --list-secret-keys --keyid-format LONG <EMAIL> -
In the output, identify the
secline, and copy the GPG key ID. It begins after the/character. In this example, the key ID is30F2B65B9246B6CA:sec rsa4096/30F2B65B9246B6CA 2017-08-18 [SC] D5E4F29F3275DC0CDA8FFC8730F2B65B9246B6CA uid [ultimate] Mr. Robot <your_email> ssb rsa4096/B7ABC0813E4028C0 2017-08-18 [E] -
To show the associated public key, run this command, replacing
<ID>with the GPG key ID from the previous step:gpg --armor --export <ID> -
Copy the public key, including the
BEGIN PGP PUBLIC KEY BLOCKandEND PGP PUBLIC KEY BLOCKlines. You need this key in the next step.
Add a GPG key to your account
To add a GPG key to your user settings:
-
Sign in to GitLab.
-
In the upper-right corner, select your avatar.
-
Select Edit profile.
-
Select GPG Keys ({key}).
-
In Key, paste your public key.
-
To add the key to your account, select Add key. GitLab shows the key's fingerprint, email address, and creation date:


After you add a key, you cannot edit it. Instead, remove the offending key and re-add it.
Associate your GPG key with Git
After you create your GPG key and add it to your account, you must configure Git to use this key:
-
Run this command to list the private GPG key you just created, replacing
<EMAIL>with the email address for your key:gpg --list-secret-keys --keyid-format LONG <EMAIL> -
Copy the GPG private key ID that starts with
sec. In this example, the private key ID is30F2B65B9246B6CA:sec rsa4096/30F2B65B9246B6CA 2017-08-18 [SC] D5E4F29F3275DC0CDA8FFC8730F2B65B9246B6CA uid [ultimate] Mr. Robot <your_email> ssb rsa4096/B7ABC0813E4028C0 2017-08-18 [E] -
Run this command to configure Git to sign your commits with your key, replacing
<KEY ID>with your GPG key ID:git config --global user.signingkey <KEY ID>
Sign your Git commits
After you add your public key to your account, you can sign individual commits manually, or configure Git to default to signed commits:
-
Sign individual Git commits manually:
-
Add
-Sflag to any commit you want to sign:git commit -S -m "My commit message" -
Enter the passphrase of your GPG key when asked.
-
Push to GitLab and check that your commits are verified.
-
-
Sign all Git commits by default by running this command:
git config --global commit.gpgsign true
Set signing key conditionally
If you maintain signing keys for separate purposes, such as work and personal
use, use an IncludeIf statement in your .gitconfig file to set which key
you sign commits with.
Prerequisites:
- Requires Git version 2.13 or later.
-
In the same directory as your main
~/.gitconfigfile, create a second file, such as.gitconfig-gitlab. -
In your main
~/.gitconfigfile, add your Git settings for work in non-GitLab projects. -
Append this information to the end of your main
~/.gitconfigfile:# The contents of this file are included only for GitLab.com URLs [includeIf "hasconfig:remote.*.url:https://gitlab.com/**"] # Edit this line to point to your alternate configuration file path = ~/.gitconfig-gitlab -
In your alternate
.gitconfig-gitlabfile, add the configuration overrides to use when you're committing to a GitLab repository. All settings from your main~/.gitconfigfile are retained unless you explicitly override them. In this example,# Alternate ~/.gitconfig-gitlab file # These values are used for repositories matching the string 'gitlab.com', # and override their corresponding values in ~/.gitconfig [user] email = you@example.com signingkey = <KEY ID> [commit] gpgsign = true
Verify commits
You can review commits for a merge request, or for an entire project:
-
To review commits for a project:
- On the left sidebar, at the top, select Search GitLab ({search}) to find your project.
- Select Code > Commits.
-
To review commits for a merge request:
- On the left sidebar, at the top, select Search GitLab ({search}) to find your project.
- Select Merge requests, then select your merge request.
- Select Commits.
-
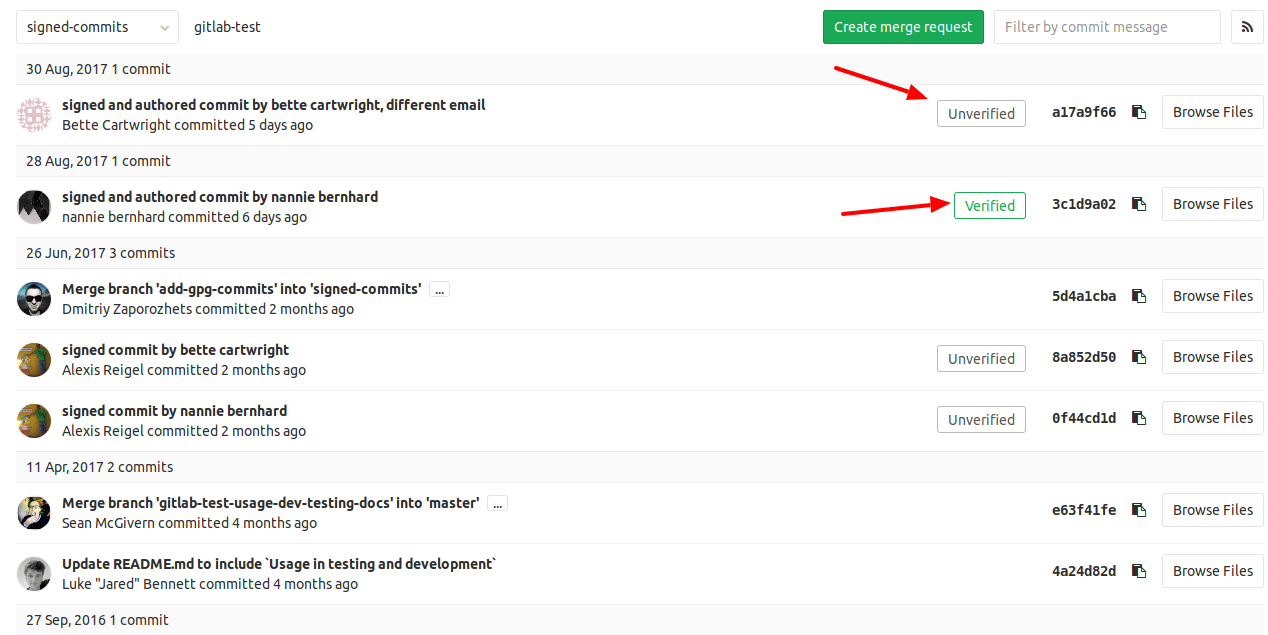
Identify the commit you want to review. Signed commits show either a Verified or Unverified badge, depending on the verification status of the GPG signature. Unsigned commits do not display a badge:
-
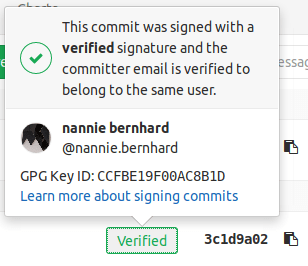
To display the signature details for a commit, select the GPG badge:

Revoke a GPG key
If a GPG key becomes compromised, revoke it. Revoking a key changes both future and past commits:
- Past commits signed by this key are marked as unverified.
- Future commits signed by this key are marked as unverified.
To revoke a GPG key:
- In the upper-right corner, select your avatar.
- Select Edit profile.
- Select GPG Keys ({key}).
- Select Revoke next to the GPG key you want to delete.
Remove a GPG key
When you remove a GPG key from your GitLab account:
- Previous commits signed with this key remain verified.
- Future commits (including any commits created but not yet pushed) that attempt to use this key are unverified.
To remove a GPG key from your account:
- In the upper-right corner, select your avatar.
- Select Edit profile.
- Select GPG Keys ({key}).
- Select Remove ({remove}) next to the GPG key you want to delete.
If you must unverify both future and past commits, revoke the associated GPG key instead.
Related topics
Troubleshooting
Fix verification problems with signed commits
Commits can be signed with X.509 certificates or a GPG key. The verification process for both methods can fail for multiple reasons:
| Value | Description | Possible Fixes |
|---|---|---|
UNVERIFIED |
The commit signature is not valid. | Sign the commit with a valid signature. |
SAME_USER_DIFFERENT_EMAIL |
The GPG key used to sign the commit does not contain the committer email, but does contain a different valid email for the committer. | Amend the commit to use an email address that matches the GPG key, or update the GPG key to include the email address. |
OTHER_USER |
The signature and GPG key are valid, but the key belongs to a different user than the committer. | Amend the commit to use the correct email address, or amend the commit to use a GPG key associated with your user. |
UNVERIFIED_KEY |
The key associated with the GPG signature has no verified email address associated with the committer. | Add and verify the email to your GitLab profile, update the GPG key to include the email address, or amend the commit to use a different committer email address. |
UNKNOWN_KEY |
The GPG key associated with the GPG signature for this commit is unknown to GitLab. | Add the GPG key to your GitLab profile. |
MULTIPLE_SIGNATURES |
Multiple GPG or X.509 signatures have been found for the commit. | Amend the commit to use only one GPG or X.509 signature. |
Secret key not available
If you receive the errors secret key not available
or gpg: signing failed: secret key not available, try using gpg2 instead of gpg:
git config --global gpg.program gpg2If your GPG key is password protected and the password entry prompt does not appear,
add export GPG_TTY=$(tty) to your shell's rc file (commonly ~/.bashrc or ~/.zshrc)
GPG failed to sign the data
If your GPG key is password protected and you receive the error:
error: gpg failed to sign the data
fatal: failed to write commit object
If the password entry prompt does not appear, add export GPG_TTY=$(tty) to your shell's rc file
(commonly ~/.bashrc or ~/.zshrc) and restart your terminal.