Reference
Application
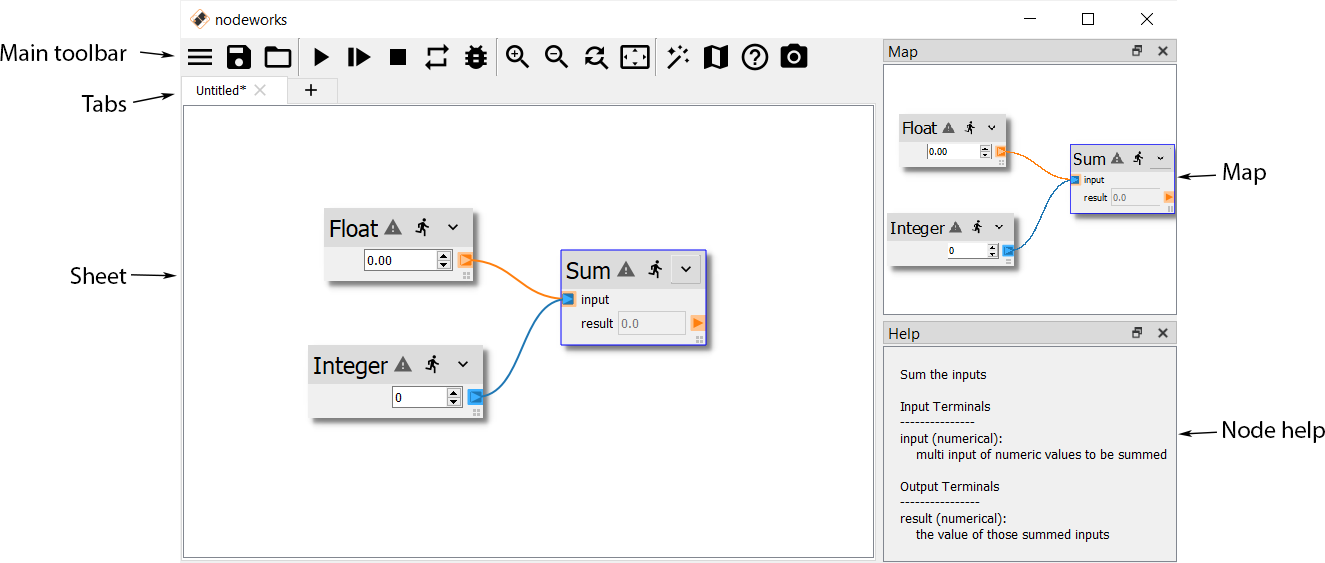
The nodeworks application provides basic functionality for creating and running sheets. Multiple sheets can be opened and edited simultaneously by using the tabs. The buttons on the main tool bar will only effect the currently visible sheet.
Main Toolbar
The Main Toolbar is at the top of the window and contains buttons that effect the currently visible sheet. These buttons include:
Icon |
Description |
|---|---|
|
Open the main menu. |
|
Save the current sheet. |
|
Open a node chart. |
|
Run the current sheet. |
|
Step through the sheet node by node. |
|
Stop a currently running sheet. |
|
Automatically run as nodes are added. |
|
Enable debug mode. |
|
Zoom in. |
|
Zoom out. |
|
Reset the zoom. |
|
Show all nodes. |
|
Open Node Wizard. |
|
Show/hide mini-map. |
|
Show/hide help. |
|
Save an image of the sheet. |


Keyboard Shortcuts
List of keyboard shortcuts at the application level.
Note
On OSX (Mac) use Command instead of Ctrl.
Shortcut |
Description |
|---|---|
Ctrl + O |
Open a sheet. |
Ctrl + N |
Create a new, blank sheet (tab). |
Ctrl + T |
Create a new, blank sheet (tab). |
Ctrl + S |
Save current sheet (tab). |
Ctrl + W |
Close current sheet (tab). |
Ctrl + Delete |
Close current sheet (tab). |
Sheet (Node chart)
The sheet is the main work area where nodes are added and connected.
Adding nodes
There are two ways to add nodes to the sheet:
Right-Click -
Right-clickon the sheet where you would like to add a node and go to theAdd Nodemenu for a list of all the nodes.Search -
Left-clickon the sheet where you would like to add a node and use the keyboard to search for a node. A search bar and list of matches will automatically be displayed.
Sheet View
The currently displayed view of the sheet in the window can be changed. The keyboard arrow keys can be used to move the view left, right, up, and down. The view can also be moved by holding the mouse scroll wheel and dragging the view around.
The sheet view can be zoomed in and out by holding control on the keyboard while scrolling the mouse wheel up and down.
Highlighting
A single node or connection can be selected by left clicking on the object. Multiple objects can be selected by left clicking on the sheet and dragging a selection box around the objects. Holding control on the keyboard also allows for multiple selections or deselection with the left mouse button. A selected object will have an outline placed around it.
Keyboard Shortcuts
List of keyboard shortcuts at the sheet level.
Shortcut |
Description |
|---|---|
Ctrl + C |
Copy the selected object(s). |
Ctrl + X |
Cut the selected object(s). |
Ctrl + V |
Paste any copied object(s). |
Ctrl + A |
Select all objects on the sheet. |
Delete |
Delete the selected object(s). |
Ctrl + G |
Places the currently selected objects into a group node. |
Ctrl + R |
Refreshes the current node library. |
Nodes
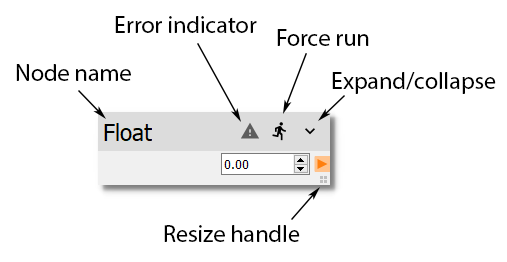
Each node has a set of common features. These features include renaming, displaying error messages, toggling force run, expanding/collapsing, and resizing.
Rename
The name of a node in the sheet can be changed. After double-clicking on the name at the top of a node, a blank line edit with the blinking cursor appears. Simply type in the line to replace the node name.
Error messages
The error icon will be enabled and highlighted red if the node encountered an error. Clicking on the icon will open a dialog displaying the error message.
Force run
Nodes attempt to be intelligent when re-running a sheet. By default nodes will check the input connections to see if the input values have changed. If they have changed, then the node will run. If the input values have not changed, then the node will not run.
Sometimes this feature is not desirable. The node can be always executed,
regardless of whether or not the inputs have changed by toggling the
Force run button.
Expand/collapse
Once a node has been set up, it can be convenient to “collapse” the node into a more compact form factor. When the node is “collapsed”, only terminals that have connections will be displayed. All other terminals that are not connected and other widgets will be hidden.
Resize
The size of a node in the sheet can be changed. Clicking and holding on the lower right corner of a node will reshape the node based on mouse movement. There is a minimum size allowed for each node.
Right-Click Menu
Right-clicking at the top of a node opens a context menu with several options for the node.
Menu Entry |
Description |
|---|---|
Show Error |
Displays the error encountered if node failed to execute. |
Expand Terminals |
Expands the node terminals to reveal any that were hidden. |
Hide Terminals |
Hides node terminals and reduces node size. |
Flip Terminals |
Reverses sides that input/output terminals are on. |
Help |
Pop-up window containing documentation for node. |
Force Run |
Forces the selected node to process when sheet is run. |
Moving Nodes
Hovering over the top portion of a node turns the pointer into a hand icon. Left clicking the mouse and holding allows for movement of the node. Multiple objects that have been selected can also be moved together.
Connections
Moving Connections
A control point can be added to a connection by double clicking anywhere on the connection. This control point can be selected and moved about the sheet like a node. This can help reduce screen clutter by removing connection overlap on nodes.
Connection and Terminal Colors
Connection and terminals are colored based on the type of data being passed through them. Connections and terminals may not properly update the color until the sheet has been run to when actual data is passed.
Data Type |
Color |
|---|---|
Integer |
Blue |
Float |
Orange |
Boolean |
Green |
String |
Red |
List |
Purple |
Dictionary |
Brown |
Set |
Pink |
Numpy Array |
Grey |
Pandas DataFrame |
Yellow |
Default |
Turquoise |