Ex. 6: Generic model submission
This example demonstrates the use of the Generic Model Creator and Queue Submission nodes to generate and submit model runs of any text based input model on a HPC.
Note
This example was run on NETL’s Joule HPC, which uses a Slurm based queueing system. However, this example should work on other systems but the queue commands may need to be changed to work with the queue manager being used.
Step 1: Setup base directory
For this example, we will create a simple python script that reads two input values (\(x\) and \(y\)) from a text file, evaluates the quadratic bowl function (\(z = x^2 + y^2\)), writes the resulting value (\(z\)) to another text file, and finally waits a random amount of time.
First, create a new directory, such as nodeworks_ex6, to contain the files.
Next, create and open a file called run.py, which will be our “model”. Copy
and paste the following python code:
import numpy as np
import time
import random

# read inputs
matrix = np.atleast_2d(np.loadtxt('./sample.txt'))

# evaluate function
rsp = np.sum(matrix**2, axis=1)

# wait random amount of time
time.sleep(random.randint(10, 30))  # seconds

# write result
np.savetxt('response.txt', rsp)
Next, create a file named sample.txt in the same directory. This file will
be our texted based model input file that the Generic Model Creator node will replace the
variables ${x} and ${y} with the sample values generated by the
Design of Experiments node. Copy and paste the following text:
${x} ${y}
Make sure you save the files and have a directory structure that looks like this:
nodeworks_ex6
├── run.py
└── sample.txt
Step 2: Setup the nodes
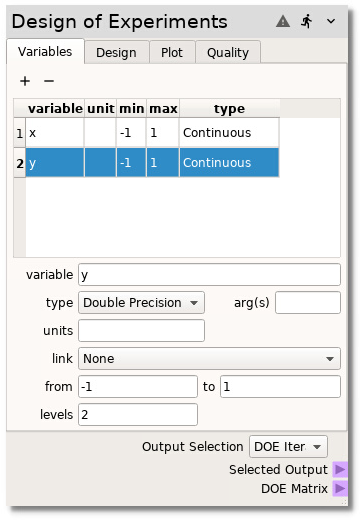
Open Nodeworks, create a new sheet, and add a Design of Experiments node. On the
variables tab, create a new variable by pressing the  button. Change the
variable name from
button. Change the
variable name from x1 to just x, matching the first variable in the
sample.txt file. Next, change the range of the variable, replacing the
0 in the from field with -1. Follow the same process to add another
variable by pressing the button, Change the variable name from x2 to
y, and replace the 0 in the from field with -1.
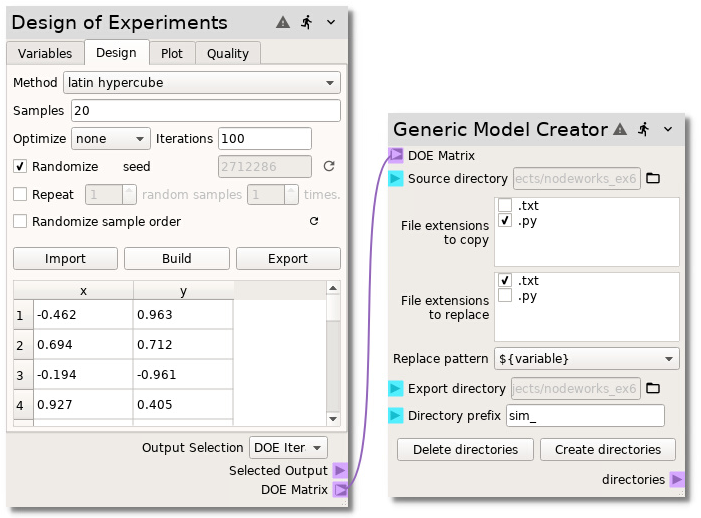
Next, make the samples by going to the Design tab, selecting
latin hypercude as the Method and changing the number of Samples
from the default 10 to 20. Finally, generate the samples by pressing
the Build button.
Now, add a Generic Model Creator node to the sheet and connect the DOE Matrix
terminal from the Design of Experiments node to the DOE Matrix terminal on the
Generic Model Creator node. Select the Source directory by clicking the  button and browsing to the directory created in Step 1 (
nodeworks_ex6). The
File extensions to copy and File extensions to replace lists will be
populated with all the file extensions in the Source directory. In this
example, you should only see .py and .txt. In the
File extensions to copy list, check the .py extension. In the
File extensions to replace list, check the .txt extension. The
Export directory will automatically be set to the Source directory and
we will leave the default Directory prefix as sim_.
The Generic Model Creator
node is now set up to create a new directory for each sample in the DOE matrix,
copying the run.py file into the new directories as well as copy the
sample.txt file into the new directories while replacing the ${x} and
${y} variables with the correct sample values. Press the
Create directories button to actually create the directories. The project
directory should now look like:
nodeworks_ex6
├── run.py
├── sample.txt
├── sim_000000
|   ├── run.py
|   ├── sample_dict.json
|   └── sample.txt
├── sim_000001
|   ├── run.py
|   ├── sample_dict.json
|   └── sample.txt
etc.
Note
The sample_dict.json file contains the variables and values used to
replace the variable names in the selected file extensions. It is a json
file that will look something like:
{"x": -0.4622, "y": 0.9629}
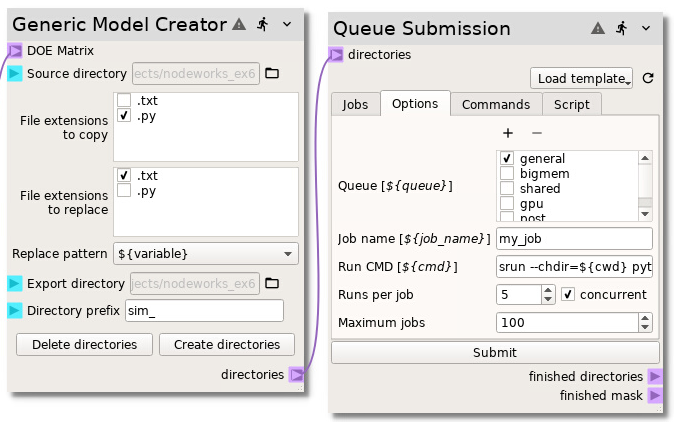
Now add a Queue Submission node to the sheet and connect the directories
terminal of the Generic Model Creator node to the directories terminal of the
Queue Submission node. To auto populate the fields with Joule specific
commands, regular expressions, and queue script, select the Load template
drop down and the Joule (slurm) template. Select the general partition
from the Queue list. In the Run CMD field is where we enter the actual
command to run out model, run.py. For this specific case, we will use the
srun command and set the working directory so we can run multiple
simulations on the same node. Enter the following Run CMD field:
srun --chdir=${cwd} python run.py
Next, change the Runs per job from the default of 1 to 5 and select
the concurrent check box. This will copy the Run CMD 5 times in the
same queue submission script. The concurrent check box tells the node to
append each run command with an & and append a wait after the run
commands, allowing the simulations to be run concurrently on the same node:
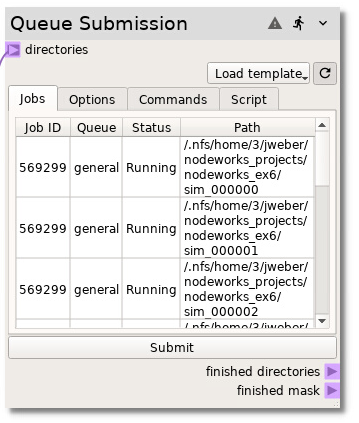
To actually submit the job scripts to the queue, go to the Jobs tab and
press the Submit button. The Jobs table will be populated with
information about the job for each individual simulation (run directory) even
though some of the simulations were submitted together in the same queue script.
Toggle the  button to enable the queue node to check the status of the
jobs.
button to enable the queue node to check the status of the
jobs.
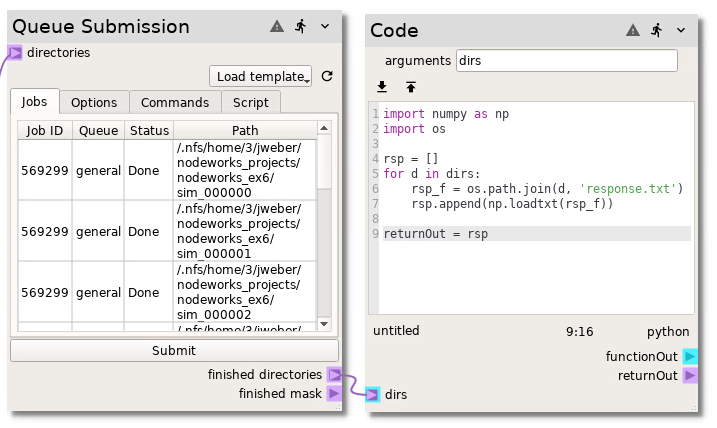
As jobs are finished, they will be added to the finished directories
terminal of the Queue Submission node. To read the resulting response.txt
written by the simulation, add a Code node. Enter dirs in the
arguments field and hit Enter on the keyboard to generate a new
terminal. Connect the finished directories terminal on the Queue Submission
node to the dirs terminal on the Code node. Finally, copy and paste the
following Python code into the Code node:
import numpy as np
import os

rsp = []
for d in dirs:
    rsp_f = os.path.join(d, 'response.txt')
    rsp.append(np.loadtxt(rsp_f))

returnOut = rsp
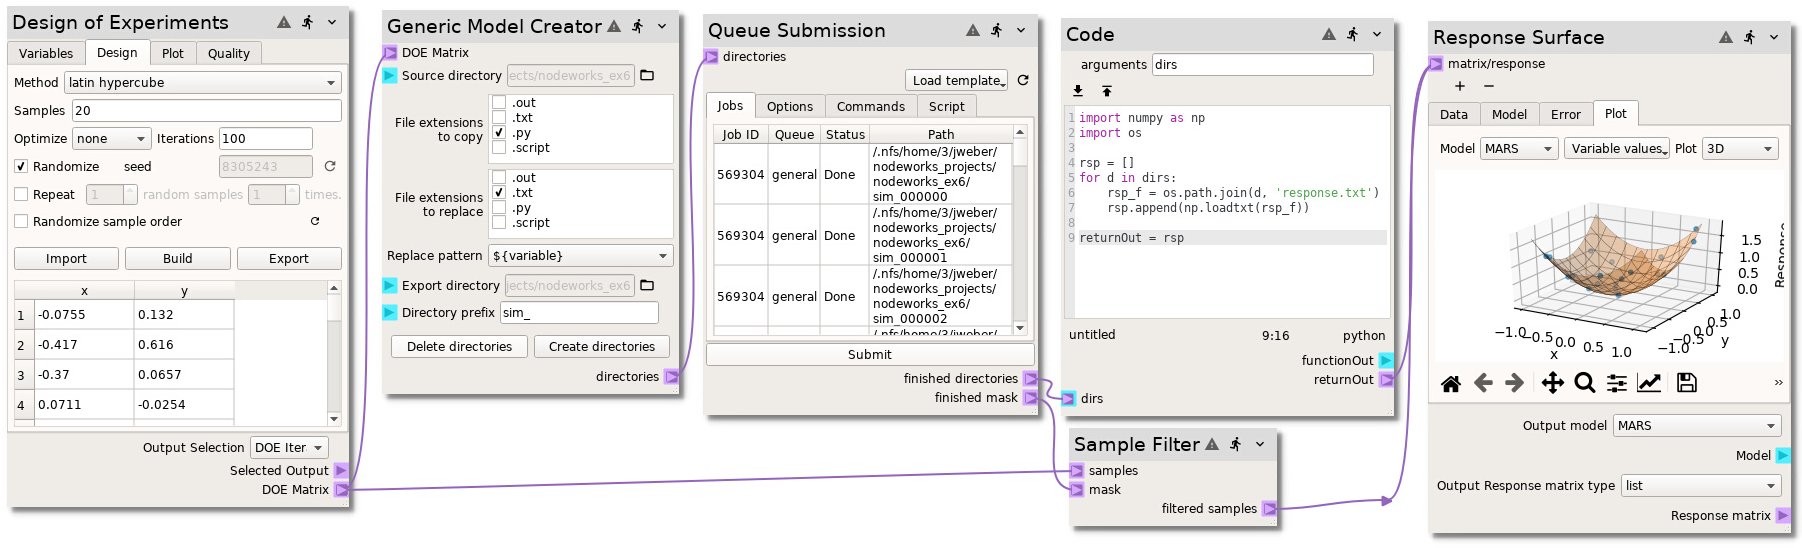
We now have everything in place to connect the samples generated by the
Design of Experiments node and the response from the Code node into the
Response Surface node. However, since all the simulations may not have run yet,
we need to filter out the samples that do not have a response. The
Queue Submission node has a finished mask that provides a list of booleans
that can be used by the Sample Filter node.
Add a Sample Filter node to the sheet and connect the Design of Experiments node’s
DOE Matrix terminal to the Sample Filter node’s samples terminal.
Next, connect the Queue Submission node’s finished mask terminal to the
Sample Filter node’s mask terminal.
Finally, add a Response Surface node to the sheet. Connect the returnOut
terminal from the Code node to the Response Surface node’s matrix/response
terminal and connect the filtered samples terminal of the Sample Filter
node to the matrix/response terminal of the Response Surface node. Run the
sheet to populate the Response Surface node with the samples and response.